The definitive guide on connecting your PC to a CRT TV
If you’ve ever wondered how to use a normal PC on a consumer CRT TV, perhaps to play retro games via emulators, then look no further. I’ve perused /vr/’s CRT threads and arcade projects and forums threads for a couple of years now, and since a year earlier been playing on what I consider my dream setup.
What TV should you use?
The world of cathode-ray tube enthusiasts in the internet can be described succinctly as a circle-jerk. Threads are often derailed by both bragging about your super premium PVM you got for 5 bucks back in 2013 in a smug tone and by replying unprompted that PVMs are shit for gaming and not what you really want. Successive posts become an exchange of “sour grapes” messages.
To this I assure you: do not despair. The most sensible approach on deciding what CRT TV you should get if you don’t have one already is… the one you can get. Seriously. Specially if it’s free.
That’s generally, but you want to wire up your computer to it, remember? Sadly, not every CRT is up to the task, but most of the ones you’ll find are. Just make sure they have component inputs. You know, those red, green and blue jacks:

My TV component inputs
This is not all, however: while your TV having component inputs is a good start, there are some that have them but perform digital processing operations on the signals they receive. In layman’s terms, this means they won’t be outputting the resolutions you want them to output, mainly, 240p1 and 480i2 These TVs are mostly late HD CRT TVs, and they are hard to come by, so chances are the TV with component inputs you found on the curb is enough. But, if you want to be certain, make sure you discard the following:
- The TV has no digital inputs, like HDMI or DVI.
- It’s not widescreen.
- Write down its model number, found in the back, and search for it on the CRT database. If it can output 480p and 1080i, you’re out of luck.
If you’re wondering why this is the case, as it seems that if you found one of these mythic HD CRTs you’ve struck gold, is that, like modern TVs, they will try to output everything in 480p, this means they will de-interlace3 the input and this will result in both poor image quality and input lag. To make matters more complicated, this is not the case 100% of the time, as some of these TVs do output a native 480i signal, and with others, while they don’t output a true 480i resolution, you could use 480p instead, and to play 240p games (pre-dreamcast) you’d do something called line-doubling4. As you can see, this is getting mind numbingly complicated real fast, and those subjects are out of the scope of this post, so I’ll only take into account SDTVs5
A case for RGB mods
If you’ve come across this article, chances are you’ve been researching this subject for a while. That means the probability of you coming across the concept of ‘RGB mods’ is high, and I’m here to assure you: they’re not needed. As long as your TV has component inputs, that is. They do make it easier to output your computer’s image into a TV by making the use of an adapter unnecessary, but, as we’ll see, the fact you have to make this mod, or pay someone else to do it, negates that simplicity, in my opinion.
RGB modding a TV for the purpose of either achieving a better image quality or making it possible for a PC to output to it is only relevant when using a composite6-only set. And even then, you probably can do an even easier mod called, yes, component mod.
But if you can instead just go out and ask your grandma to give you her old TV with component, just do that.

RGB modding a TV with component inputs be like
Aren’t RGB and component… different?
Yes, they’re different color spaces, but RGB signals can be converted to component, or, more precisely, YPbPr trivially via passive adapters7. This means no input lag.
I’ll concede that adding RGB capability to your TV sounds great because that’s the color space that the VGA connector uses, that’s why you wouldn’t need an adapter. But I cannot testify that the image quality is drastically better than the one you’d get using component inputs, specially better in such a way that it’s worth it to attempt this mod, which requires technical competency.
Hardware guide
I suggest checking both the Batocera CRT Script compatibility guide and the Groovyarcade hardware suggestions general for the specifics, but, generally, only the GPU matters. And it’s almost mandatory for that GPU to be an AMD card with analogue ports: either VGA or DVI-I.
These cards are cheap as hell, I’m talking 15 bucks on ebay, and almost everywhere. That’s also another advantage of this setup compared to, say, a MiSTER: you’ll save a ton of money while not sacrificing quality in your gaming experience.
I’ll suppose you’re either acquainted or aware of good-old VGA. DVI-I, on the other hand, was never as popular, and the existence of DVI-D shrouds it in mystery even more. But, the difference between DVI-D and DVI-I is that the latter can output an analogue video signal, while the former is almost a subset of HDMI, which is entirely digital.
To differentiate them, note that rightmost pins of a DVI-I connector are in the form of a cross with four points in each quadrant, like this. When using DVI-I, you’ll be able to use a simple and cheap passthrough adapter in order to connect your GPU to the VGA port of your VGA-to-Component adapter.
If you want more specific recommendations, I’d advise you to look on either ebay or facebook marketplace for the following cards:
- R7 240
- R7 250
- R7 250x
- HD 8350
And, for a more general search, you can look for “AMD Radeon OEM”8, again, just make sure it has either a VGA or DVI-I port.
For all the other computer parts that are not the GPU, the same rule as the TV applies: whatever you can get either cheaply or for free. Seriously. Sadly, emulators are CPU heavy, so the only exception to this would be if you’d like to play the Nintendo 64, Playstation and Sega Saturn cores on retroarch. In that case, get anything better than a Core i5 2550k, which would be most CPUs launched in the past 9 years. Any Ryzen of any generation would work, too, specially Ryzen 5 and up. Personally, I’m rocking a Ryzen 5 2600, but I’ll build another PC for this exact use case with a Core Duo from 2010. Of course, I won’t be playing sega saturn, but everything up to that generation of gaming will be fine.
With a good CPU, and with that I mean anything better than a first gen Ryzen 5, you can also try run-ahead latency reduction9.
RAM, storage and power supply are irrelevant. Buy the cheapest you can get, and for storage, 240GB is a good start, if you want more, well, buy a bigger SSD.
While in this guide I’ll assume you’re using an exclusive PC for this, you can also use your main one, via dual-booting10. This is specially useful if you’ll have your CRT TV in the same desktop as your main PC, like in those battlestation threads where you can see a tiny CRT TV alongside the monitor. If this is your setup (i.e., you’ll use the same PC you use for modern gaming, work, etc.), take these into consideration:
- Use another storage drive for the operating system you’ll use to play on your CRT. Specially if you’re on windows, as every windows update likes to meddle with your bootloader and render the other operating systems present in different partitions on your drive unbootable. Oh, also, you won’t have to bother with partitioning your main drive and risking data loss.
- Connect the GPU in a different PCIe port, this seems obvious, but I mention it so you can be sure this means you can use your main OS with your more powerful, modern card and use the old, cheap-ass radeon you’ll buy exclusively for retro gaming.
- In every part of this tutorial where I tell you to unplug any other non-analogue port (remember, you’ll use the VGA/DVI-I port of your radeon card) I also mean your other GPU’s ports and your motherboard’s. You don’t want your CRT TV ready operating system to use your nvidia card, believe me.
- If you’re on windows, tough luck. Every time you want to boot into your retro gaming OS you’ll have to get into your BIOS’ boot screen/setup menu (something you’d normally do only for installing a new operating system). If you took the red pill and are using a linux distro as the main operating system of your PC, you can use GRUB to detect your gaming OS and make it show up in the boot menu.
The adapter
This is the piece of hardware that will allow you to connect your PC, which would normally output an RGB signal, to your TV, via component.
For a long time this was the missing piece of the puzzle and it’s what killed my first attempt at this 5 or 6 years ago, but no more. (God this is starting to sound like an ad) I recommend bitfunx’s RGB to YPbPr adapter. It’s cheap, it works (which is a novelty for chinese products in this market segment) and it’s not unobtanium like most other RGB to YPbPr adapters.
It’s what I’ve been using these past two years and I have had no issues whatsoever with it, the image quality is great. Although some people report the color codes of the component jacks are not standard (as in, the green, red and blue jacks have their color switched up, so you must check which combination works) that was not the case for me.
What I do recommend though, is getting a good quality VGA cable and, if it’s your case, a good DVI-VGA passthrough, too. By rule of thumb the good cables are thicker than the bad ones. At first I used a random cable I came across on my house and a passthrough the dude who sold me the cheap radeon card gave me but artifacts like ghosting were noticeable with them. I ruled out the adapter by connecting the computer to a regular monitor, so do be wary of that.
Software
On the software side, most people will recommend you hack your GPU by installing a special driver for your card called ‘CRT Emudriver’, which allows your GPU to be driven to the low dot-clocks11 needed to output CRT TV compatible signals.
This is for use with windows. I’ll take the mask off now, and tell you: I hate windows, and I would never recommend anyone to use it. But here, I wouldn’t recommend it not only because of a matter of principles, but because the alternative is arguably easier and better.
The solution here is a linux distribution, and a linux distribution either designed from the ground up for this use case (wiring the PC to an esoteric 90’s black box display) or that can acquire that feature.
What makes this easier than CRT emudriver and windows is that you don’t need to install anything specific for your hardware and you don’t have to go to the BIOS setup for anything other than booting your linux usb: the linux kernel can be patched to support 15 kHz horizontal frequencies, e.g. those used by consumer TVs (computer monitors, connected via VGA and capable of outputting higher resolutions are driven with a 31 kHz frequency instead).
The display server we’ll be using on linux can too be configured with modelines12 specifically for CRT TVs.
Ok… I know that there’s no universe in which that sounds easier than ‘installing CRT emudriver’. Linux kernel 15 kHz patch? Modelines? What the fuck. But the simplicity of this setup lies in the fact that the distribution we’ll install already does all of that for us, out of the box, batteries included, plug and play. We only have to burn a linux iso with balena etcher, plug it in the computer we’ll use, turn it on, press either F12 or DEL like crazy, boot our USB and press enter a few times. That’s it.
Being bespoke distributions, the two I’ll showcase here are designed as game centers/consoles, as in, you turn it on and use your controller to navigate between your games. How can that get even comfier? It can’t, this is the peak retro gaming emulation setup.
While I used groovyarcade at first, I’ve been favoring batocera lately. The difference between them is that groovyarcade is from the ground-up an operating system for arcade machines/CRT game centers: when you install it, it prompts you to choose the setup that best fits your case (being consumer CRT TVs, we’ll all choose the same option). It just works but I do concede that is oriented more towards power users: I’ll recommend you configure retroarch as its main “front-end”13.
Batocera, on the other hand, is a more generalist distro. It is designed from the ground up to be a console basically, you can configure the theme of its menu, download cover art, even watch movies via kodi and it is easier to play PC games, as in, non emulated ones, via lutris or specific linux binaries. Using batocera on CRTs, unlike groovyarcade, is a matter of running a script post-installation. That sounds kinda scary, I know, but let me show you: you’ll just have to copy a couple commands verbatim from here and press enter a few times and that’s it.
Installing Groovyarcade
Head on over to the groovyarcade’s releases page and download the .iso.xz file. You want an .iso though, not an .iso.xz. You can use 7zip to extract this file on windows.
If you’re on linux or any other unix or unix-like, try with unxz:
unxz groovyarcade-2024.07-x86_64.iso.xz
If you’re on windows, I recommend balena etcher to burn the .iso to your USB. How to use it is outside the scope of this post, and I don’t have access to a windows machine, so just search for a balena etcher tutorial. You’d basically just connect your USB, open the program and select the groovyarcade iso.
When you have your USB ready, connect it to the PC you’ll use with your CRT. Suffice to say I do recommend using an entirely different machine, and install the operating system in the PC’s main storage as the sole OS available, so you don’t have to deal with dual booting.
If you’re using a fresh machine with no operating system present in its main storage chances are you won’t have to do the following as it will boot directly to your USB. So, try first booting your PC normally with your USB attached to check if this is the case.
If your USB doesn’t boot automatically, then when turning on your PC, the boot screen should tell you what key to press if you want to access either the boot menu or the BIOS configuration. This varies across motherboards, but it is usually either F12 or DEL, pay attention to what the boot screen tells you. If your motherboard’s BIOS has a boot screen, just select your USB. If not, then you’ll have to set it as the main boot option.
Here comes what is probably the biggest technical hurdle in this tutorial: when installing groovyarcade (and running the script in batocera) you must have your PC wired to the TV via the adapter and not use any other of your GPU’s ports. So, if you’re using a GPU with a DVI-I and Display ports, you must have only the DVI-I connected.
This is an issue because both the BIOS’ and Groovyarcade installation medium’s boot screen aren’t compatible with a CRT TV. What you’ll get if you switch to the component input while the PC is booting up is a garbled mess that may harm your CRT, as at this point in time your CRT is outputting an image with a 31 kHz horizontal frequency.
There are two ways to remedy this. The first one is to use a cable like this to display the image to two monitors at once: one of which will be your TV and the other a regular VGA monitor.
The other is to, first, make sure your USB boots by default, either by being the only bootable medium present or by being the default. Once you make sure it boots unprompted, connect your PC to your TV, turn it on, wait 30 seconds or so, while having your TV either turned off or switched to another input, then, switch to the component inputs, you’ll then see what it appears like the following menu (but all garbled up and going up and down):
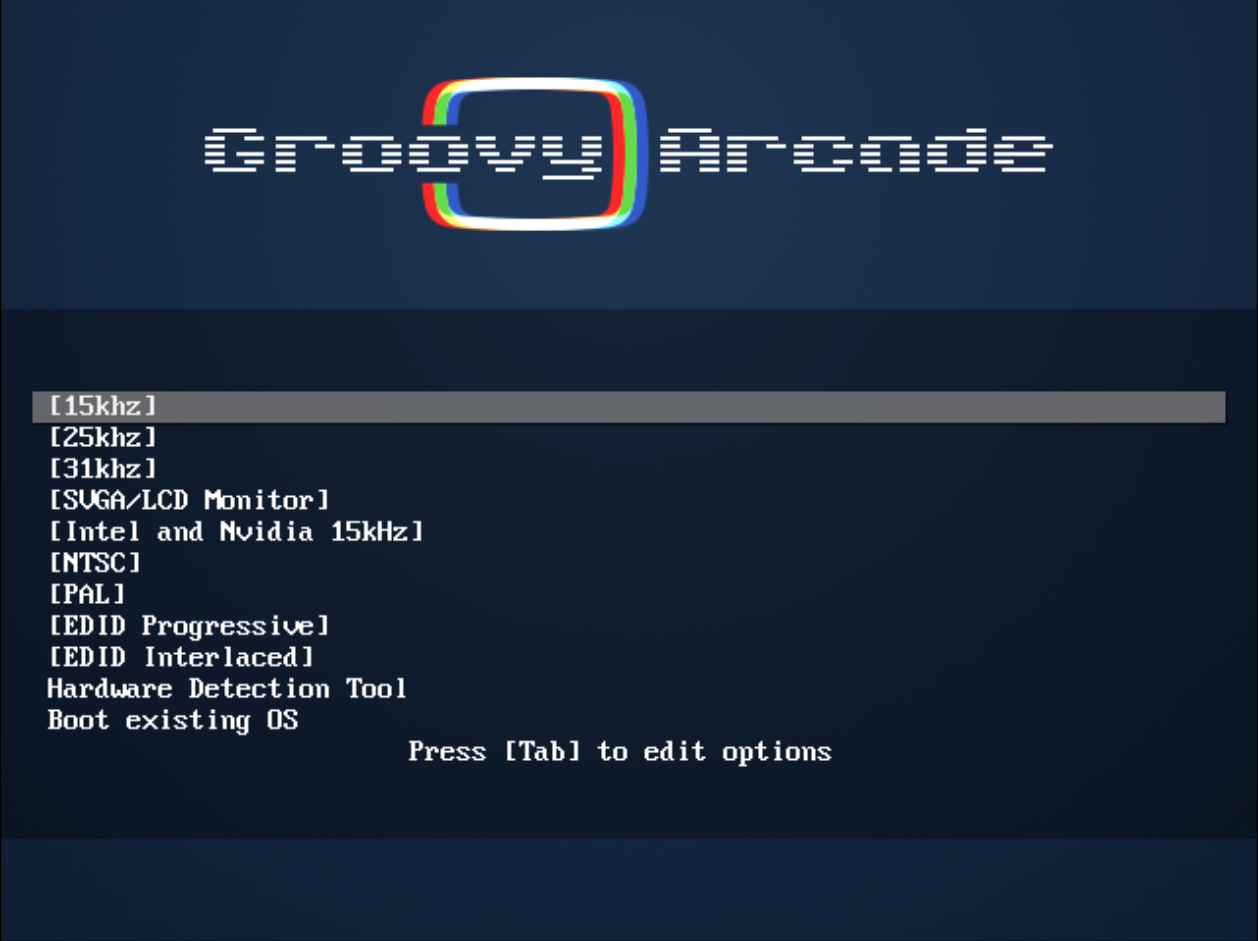
If you don’t want to risk it, then wait a minute to be sure and press enter once, after a couple of seconds switch to the component input. The TV should be displaying a usable image.
When you press enter once you will tell Groovyarcade to start outputting a more CRT friendly image with a horizontal frequency of 15 kHz so you can continue the installation. You only need to press enter once because this is the first option the cursor is pointing at; the other 15 kHz option is for nvidia and intel plebs, and you’re using a radeon, right?
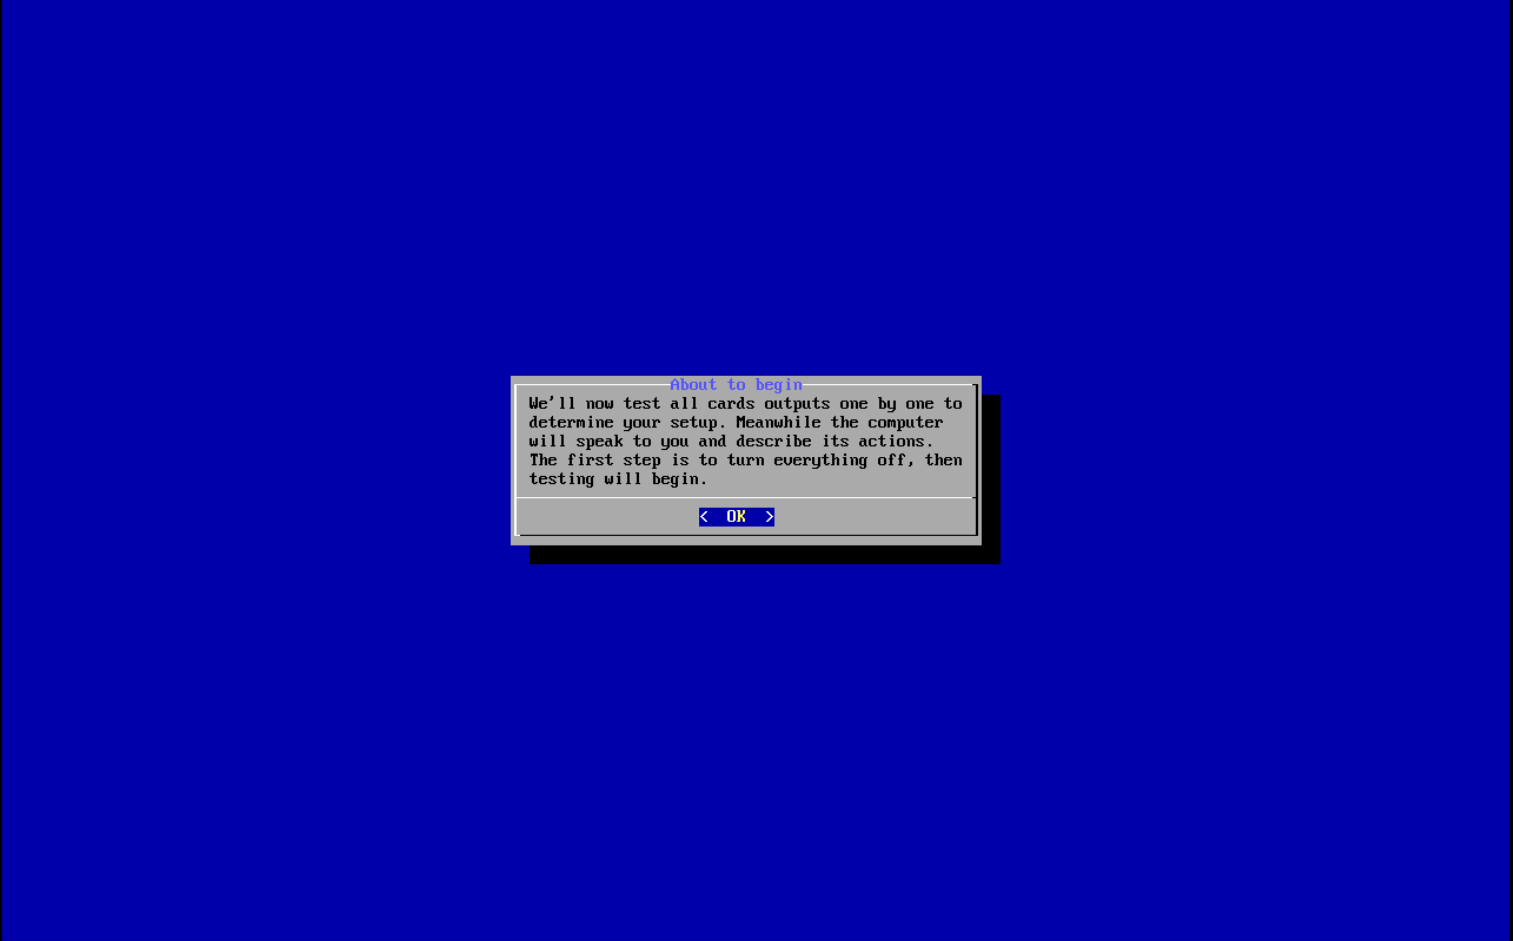
When groovyarcade is trying to output a useful signal, it will ask you to confirm if you’re seeing the output correctly. Press enter. After that, it will start testing your hardware.
It is recommended to have a speaker connected to the PC to be in the loop. This will be quick if you only have the analog connector active.
After the tests are finished, it will tell you the results:
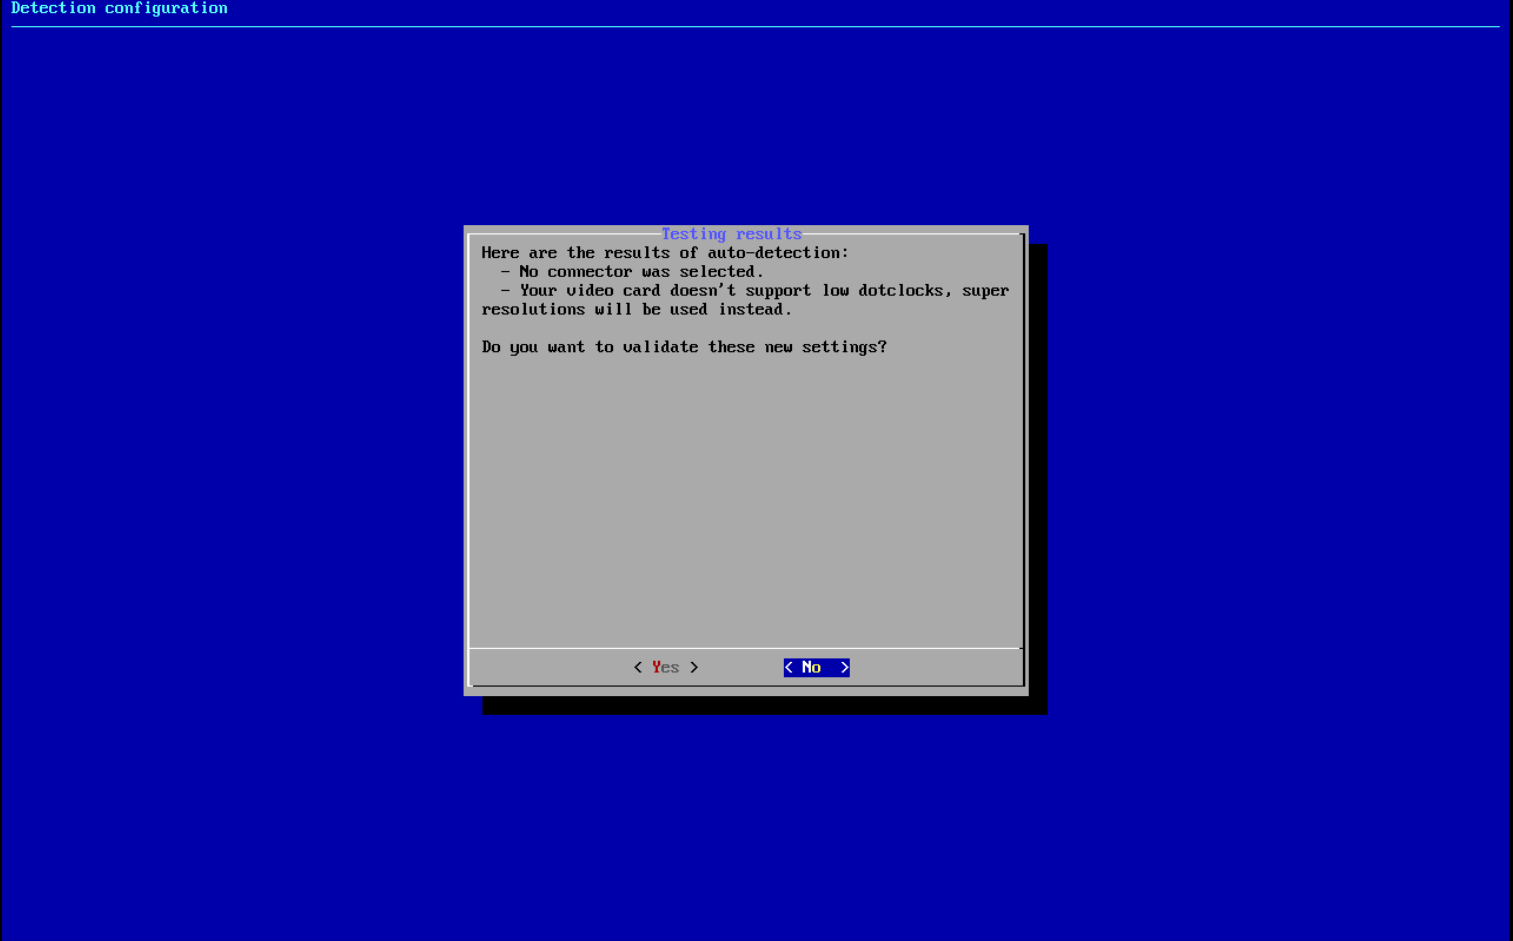
In my case I failed in every respect, as I’m using a virtual machine in QEMU to take screenshots, but if you’re using a radeon card with analog out like I told you it’ll probably tell you that your card is ideal and that you can output native resolutions.
If this is not the case, it then will tell you that groovyarcade will use super resolutions14 instead. This is fine, both standard resolutions will still be available (240p and 480i), refer to the glossary for the explanation on this. The worst case scenario is that you’ll only be able to use 240p as it still is possible that your card doesn’t support interlaced resolutions, but this is rare on radeon cards, even in ones as recent as the RX500 series (via display port and a special adapter of course – I didn’t mention it in the hardware section as I’m not familiar on using display port, and vehemently recommend to use analog outputs instead).
After confirming your setup, Groovyarcade will then ask you for the desired mode:
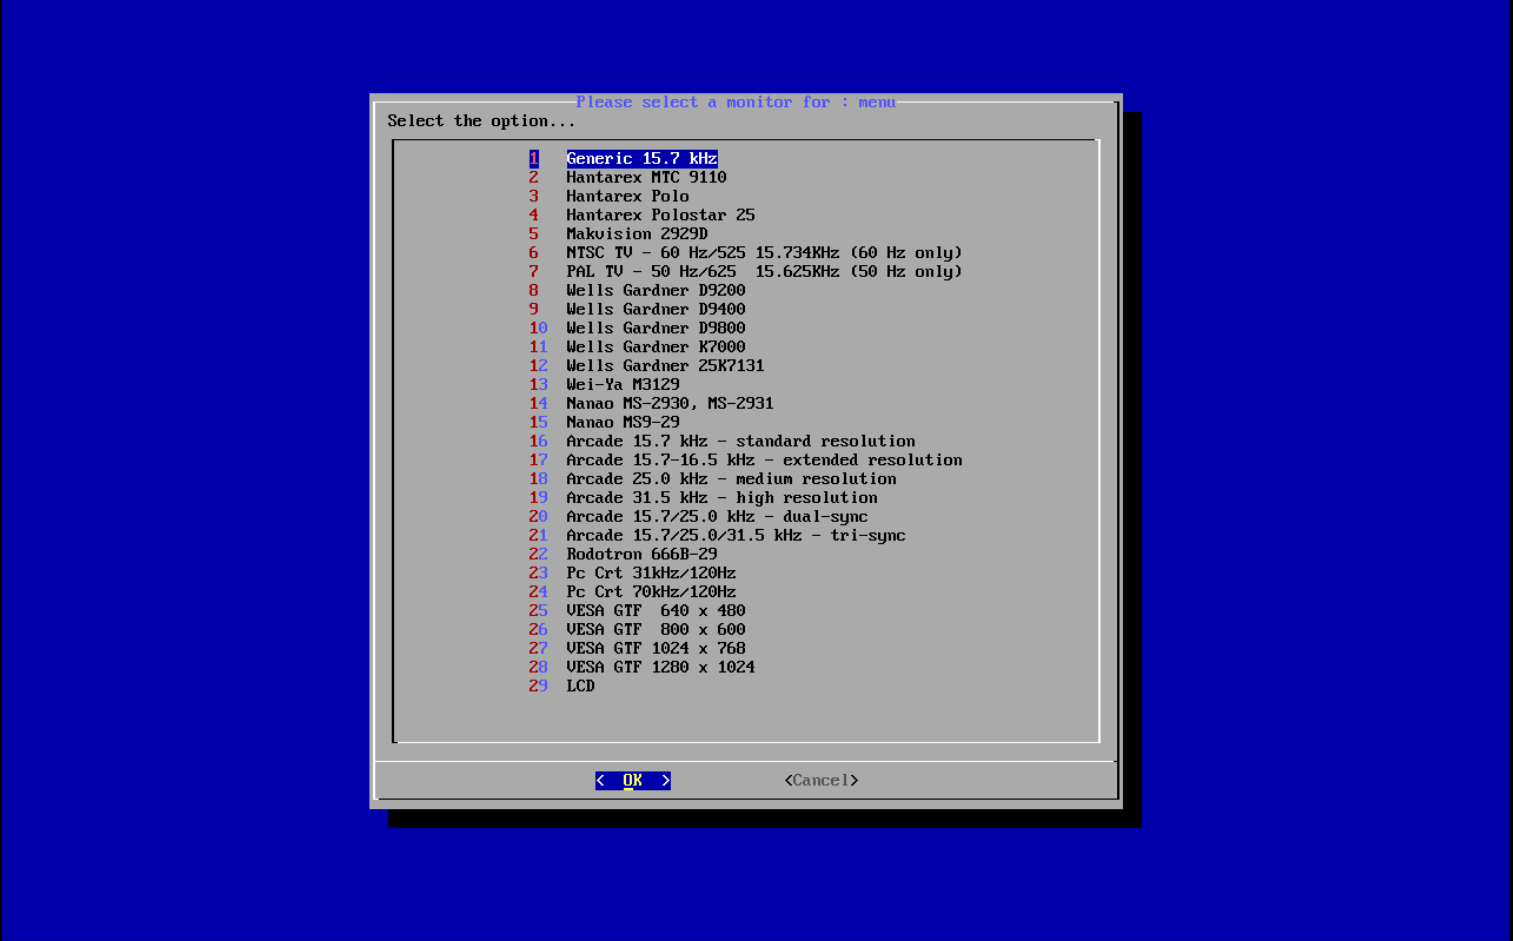
The only ones that we care about are the 15 kHz ones: the first, generic one, NTSC TV and the arcade standard resolution. When I installed groovyarcade I chose NTSC, but in batocera the recommended one is the arcade standard resolution, so you can pick either. If you’re not sure, just pick NTSC.
After this, everything that follows is usual operating system installation stuff: choose HD installation to install groovyarcade in your main storage (suffice to say, make sure you don’t have anything important there), choose your drive, don’t skip swap and wait for the installation to finish.
After that, unplug your usb, switch to another input, reboot, wait, switch back. You should be on the attract mode screen.
Setting retroarch as the main frontend
After installing groovyarcade, it should boot to Attract Mode, groovyarcade’s default front-end. If you only want to play arcade games, via (Groovy)MAME, you’re set, but, for a more generalist emulation machine, I recommend setting up retroarch. Suffice to say, you need to use a keyboard, groovyarcade’s menu doesn’t work with a controller. Bummer.
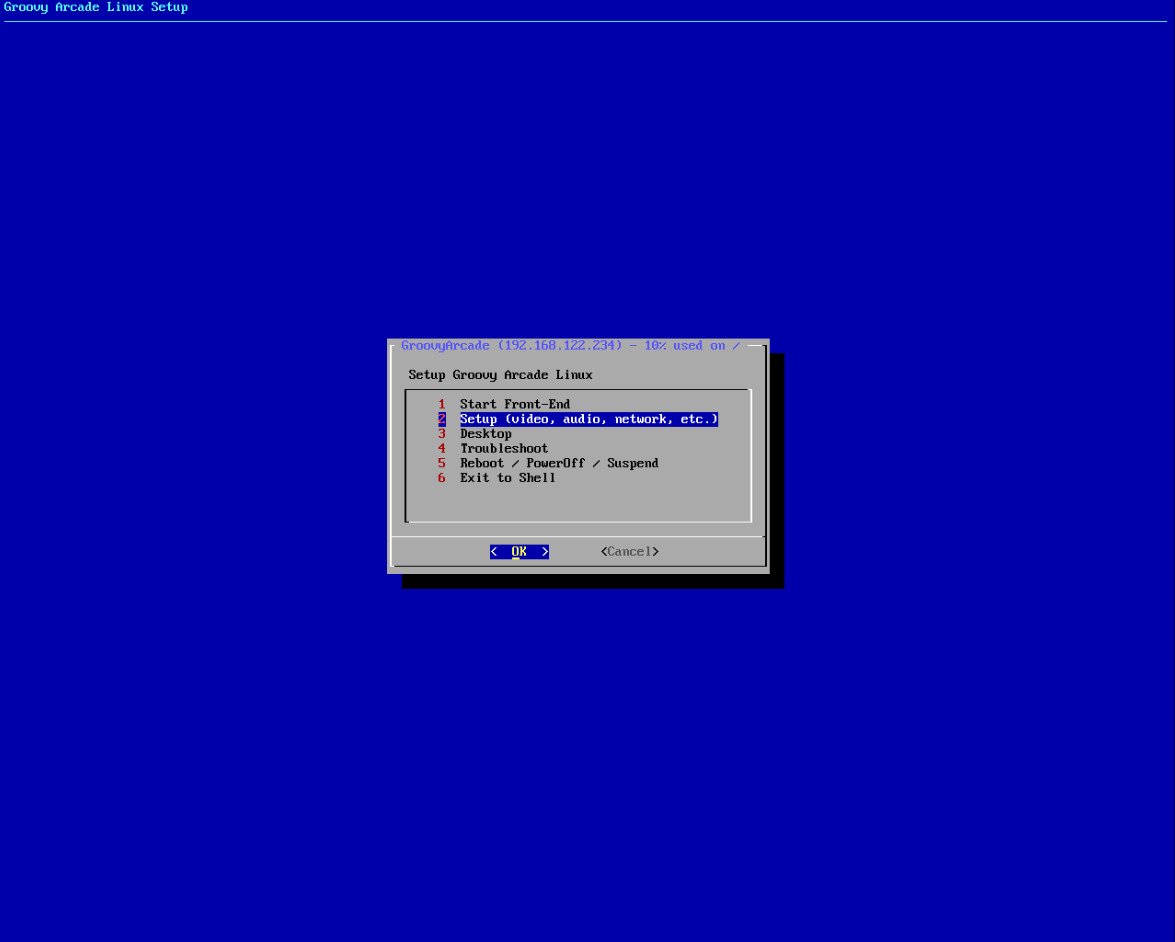
For this, press escape inside attract mode and select Exit Attract-Mode to return to groovyarcade’s main menu:

Go to setup, and then select Front-End/Window Manager. In the following menu:
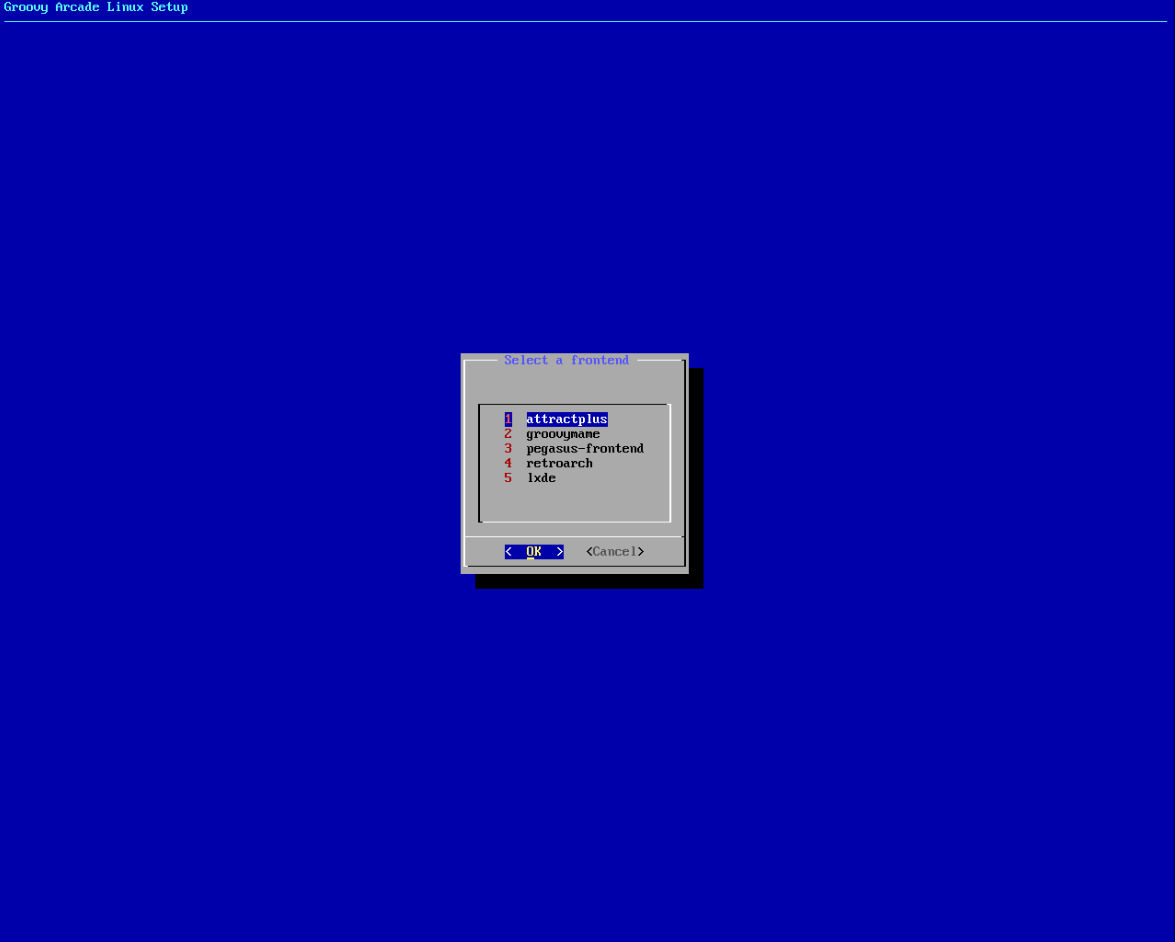
Select retroarch. It will tell you it is missing for your system, and prompt for its installation. Select ‘Yes’. After installation, it will be set-up as the default
frontend.
After that, back in the main menu, select Emulators Setup and then select Retroarch. Click yes when it prompts you to perform a full system upgrade. It will
show you a monstrous list of packages to either install or update. Click ok:

After that, it will ask you to run an esoteric command, sudo pacman -Syu, in non-linux language, this means ‘Full system upgrade’. If it asks you for missing
retroarch packages, press enter on ‘Yes’. This will install all necessary retroarch ‘cores’, or more plainly, emulators. After finishing installation, you can
now use retroarch. From the main menu, run it by pressing enter on Start frontend.
Configuring retroarch
When in retroarch, you should enable switchres. This is a program that will make retroarch output a resolution according to the game you’re playing. So, if you’re playing a Dreamcast game, the resolution will switch to 480i, 240p if you’re instead playing a snes one, all of this on the fly. Cool, right?
To do this, go to Settings > Video > CRT Switchres, and, in the CRT Switchres configuration menu:
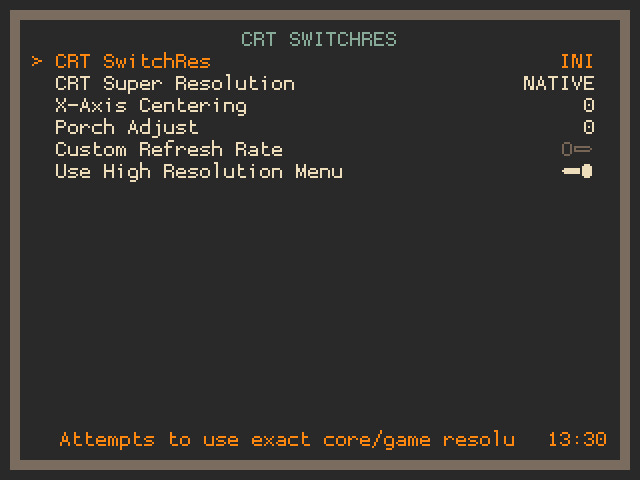
Set INI in the CRT Switchres option. If, when installing groovyarcade, it told you your GPU was compatible with low dot clocks, select Native in Super Resolution,
if not, you will need super resolutions. Select the one that works for you. It’ll work for you if it displays at all, but you can’t go wrong with 2560.
Transferring games
To transfer games to your groovyarcade system remotely, you can use SFTP. If you go back to the screenshot of the main menu,
in the top you can see my system’s IP address; that’s where yours is going to be, too. Write it down. After that, if you’re on windows, install filezilla.
When you open it, in the top left corner you’ll see some fields: address, user, password and port. In address write down your groovyarcade system’s local IP,
in both user and password arcade and in port select port 22. After you click connect, in the bottom you’ll see a directory called shared. Click on it, then roms,
and you’ll see a bunch of directories with names like ‘nes’, ‘snes, ‘psx’, etc. These are the systems emulated by your machine. Transfer your roms, via filezilla,
accordingly. (NES roms into the NES directory, playstation games in the psx one, etc.)
Installing Batocera
Head on over to the batocera project page. Select the option for desktop PCs. Follow the process detailed in the groovyarcade section to burn and boot the batocera live iso. Just do note that batocera’s bigger: use a USB with a capacity of at least 16 GB.
Do not connect your PC to a CRT TV just yet, use a regular monitor instead.
When you boot to batocera, you’ll actually boot up into a live ISO: you can use batocera off the USB. But we still have to install it to ensure a smooth experience with a CRT TV.
For this, (if using a keyboard) press space, you should see the following menu. Search for System settings and click on it (or press enter if using only a keyboard):
Go all the way down until you find the Install on a new disk option.
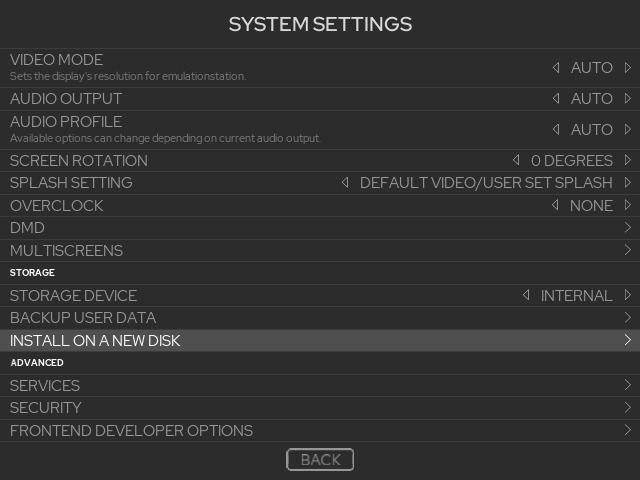
Click on it, and you should see the following menu:
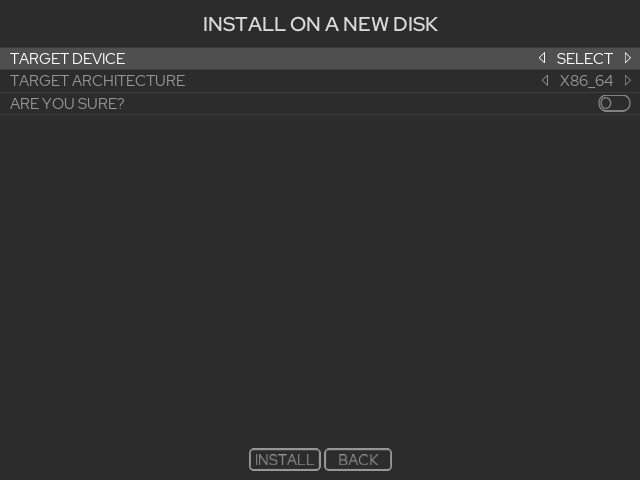
In Target device select your main storage device, in target architecture, x86_64. Confirm and install. After the installation is finished, power off your computer,
unplug the USB and turn it on. You should boot straight into batocera.
Enable SSH
To connect to your batocera system from another computer, you must enable SSH (Or secure shell). For this, when you’re in batocera’s main menu, press F1 on your
keyboard. This will take you to a file manager. Inside, navigate to /userdata/system/ and open the batocera.conf file. You should see a text file like this:
# ------------ A - System Options ----------- #

## Security
## Enable this to enforce security, requiring a password to access the network share.
#system.security.enabled=0

## Services
# exampe: system.services=service1 service2
#system.services=

## Display rotation
## Leave commented out -> Auto.
## 0 -> No rotation.
## 1 -> Rotate 90 degrees clockwise.
## 2 -> Rotate 180 degrees clockwise.
## 3 -> Rotate 270 degrees clockwise.
#display.rotate=0

## Power button behavior
## Change what the power button does when pressed.
## shutdown -> Immediately shutdown the system.
## suspend -> Enter low-power standby mode.
## hybrid -> Enter an even lower-power standy mode, only available on supported devices.
#system.suspendmode=suspend

## File system compression (btrfs only)
## Natively compresses files as they are stored, reduces disk write speed but increases space available.
#system.fscompression.enabled=0

## Send the CEC standby command to the first video output device during shutdown.
#system.cec.standby=1
Press Control+F and search for system.ssh.enabled. Set its value to 1 thus:
system.ssh.enabled=1
If it’s preceded by a # character, like this:
# system.ssh.enabled=1
Remove the # character and reboot your computer.
Before you continue, you must first know your system’s local IP address. For this, press space to bring up the menu again and go to network settings. You should see the following menu:
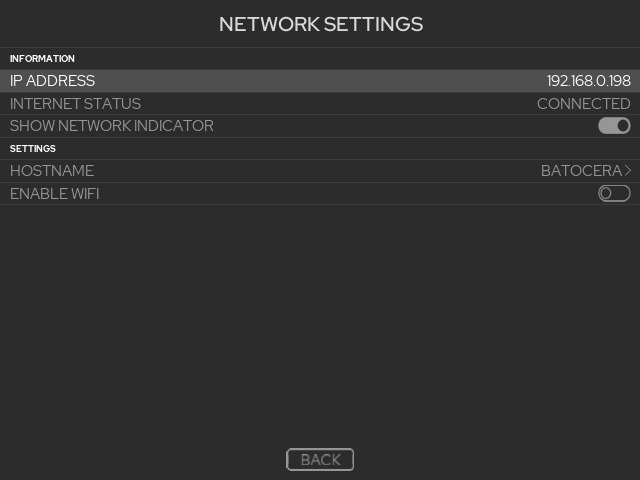
Write down the IP address.
After this, power off the PC. Disconnect any of the video ports of your GPU and now connect it to your CRT via either DVI-I or VGA through the adapter. Make sure the TV is either turned off or switched to another input and then turn on the PC.
Configure batocera for use with a CRT TV
As it stands, you still cannot use your batocera system on a CRT TV, for this you must download and run the batocera CRT script, which will run the setup groovyarcade did during its installation: patch your kernel with 15 kHz support, install the necessary modelines and tell the bootloader to use the 15 kHz kernel alongside the most appropriate modeline for your TV.
Don’t fret: this script is just a plain-text wizard, press enter when it prompts you and select the Arcade 15 kHz option when it comes up.
Just as you should when transferring games to groovyarcade (and batocera too), download and install filezilla on your main PC (if you’re on linx, your file manager should come with a SFTP client out of the box).
When opening filezilla, in user, write root, in the address field, the IP address of your batocera system, linux in password and in port, 22. When clicking connect,
you should see a directory tree similar to this:
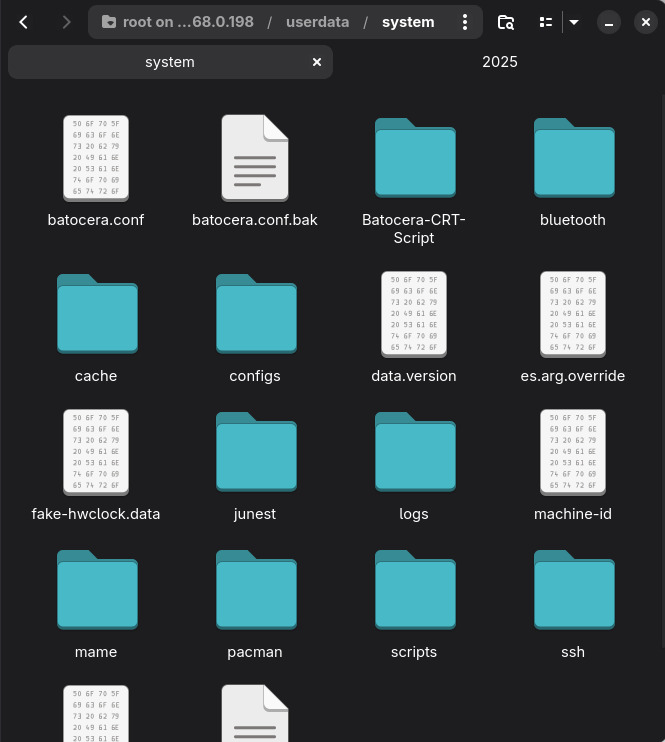
This is the system directory, found in /userdata/system.
When filezilla is ready, download the CRT script archive and extract it. Enter into
that directory, which should be called Batocera-CRT-Script-main. Then, go to userdata, then system and you should see a directory called Batocera-CRT-Script.
Drag and drop it inside the /userdata/system directory in filezilla.
Next, open a terminal. If you’re on windows, it’s called powershell, and SSH should be already installed.
Write the following command on your terminal:
ssh root@[YOUR IP ADDRESS]
It will prompt you for a password; type linux and press enter. If it seems as if nothing’s being written (i.e. * characters are not appearing to obscure the
password), that’s normal, just press enter after typing the password.
After that, your terminal should show you the following text:
      ____    __   ____  _____  ___  ____  ____    __
     (  _ \  /__\ (_  _)(  _  )/ __)( ___)(  _ \  /__\
      ) _ < /(__)\  )(   )(_)(( (__  )__)  )   / /(__)\
     (____/(__)(__)(__) (_____)\___)(____)(_)\_)(__)(__)
                 R E A D Y   T O   R E T R O


-- type 'batocera-check-updates' to check for stable branch --
-- add 'butterfly' switch to check for latest arch developments  --

Model: B450M_DS3H
System: Linux 6.15.11
Architecture: x86_64
CPU Model: AMD Ryzen 5 2600 Six-Core Processor
CPU Cores: 6 / CPU Threads: 12
CPU Max Frequency: 3400 MHz
CPU Features: avx2 sse4_1
Temperature: 49°C
Available Memory: 7027/7887 MB
Display Resolution: 640x480
Display Refresh Rate: 59.96Hz
Data Partition Format: ext4
Data Partition Available Space: 137G
Network IP Address: 192.168.0.198
OS version: 42o 2025/10/06 14:36
As you can see from the resolution, my system’s already configured
Now, type:
cd /userdata/system/Batocera-CRT-Script/Batocera_ALLINONE/
To get in the CRT script’s directory. After that, type:
chmod a+x Batocera-CRT-Script-v42.sh
Before proceeding, make sure you’re not using any other of your system’s video ports; only your GPU’s analogue output (DVI-I/VGA) should be in use, connected
to the TV via the adapter.
When you’re sure of this, execute the script by typing:
./Batocera-CRT-Script-v42.sh
The setup wizard will start. Press enter when prompted, go with the defaults. When it prompts you for your type of display, select Arcade 15kHz, if you’re
using a consumer CRT TV that is.
After it finishes and you reboot the computer, you can transfer games just like you would with groovyarcade. In batocera, the ROM directories can be found in
/userdata/roms. Retroarch is already configured with switchres for use on a CRT TV.
Conclusion
I’m still hard pressed in recommending groovyarcade if you want a simple experience in both installing the operating system and using it (is just a retroarch machine, and with rgui. So you don’t have to bother with scraping data). It has also an advantage over batocera: it doesn’t abstract away linux.
Batocera is more comparable to firmware in its user experience than with an operating system: it does one job and does it well, but it abstracts linux way too much: you can’t install basic utilities like git or compilers, it just comes with what it comes with, and that’s it. For me, this is… kinda bad, and although people could call out my bias as a linux user I don’t think this is bad because I want to use linux on my games system, I think it is because having an actual linux distro with packages to install and utilities to use opens up a world of possibilities, specially on batocera, which is a distro that makes it easy to configure linux games. Sadly, configuring those same games can be a pain without a full linux system.
Groovyarcade, on the other hand, follows a user experience philosophy that I really like: it can be as complicated as you’d like. Hell, it even provides a desktop. It’s not something I’d normally recommend you use, but with groovyarcade you have a linux system that just so happens to be able to be hooked up to a CRT TV.
If you want to keep it simple, just use it as a retroarch machine. I’ll concede that having to use the desktop when wanting to play linux games is less than ideal. The comfiest option would be to boot those games from your frontend, using your controller. Something batocera would make possible, but as I said, the selection is limited by the distro’s own limitations as a linux system. So no, no compiling crispy doom, you don’t even have a compiler.
One thing is true though: either option is miles better than using CRT emudriver, so use these, and happy gaming.
Glossary
-
240p: The resolution of most videogame consoles up to the Sega Dreamcast. It can be understood as a resolution that outputs 240 horizontal lines all the time, without blinking. It can be seen as a 480i2 that only shows one segment every frame. ↩
-
480i: Also called Standard Definition. In this resolution, the frame is divided in two segments of 240 lines each, which then are rendered one after the other, resulting in an effect in which the frame’s composing segments interweave between each other. ↩ ↩2
-
De-interlace: To grab a 480i signal and mix both frame segments into one, giving the appearance of a progressive image. This requires processing and is the main reason why flat panels are terrible for retro gaming. This too happens to a 240p signal, as it basically is a hack on 480i. While a CRT doesn’t care to show only one segment of the image, for a digital TV this is just another Standard Definition signal and must, too, be de-interlaced. ↩
-
Line doubling: Basically, make a 480p image pass as a 240p one. This results in thicker scan-lines. ↩
-
Composite: That yellow jack connector ubiquitous in the analog era. ↩
-
Passive adapter: An adapter that converts a signal into another without digital processing. ↩
-
These were cards present in branded computers and all-in-ones, mostly Dell’s. ↩
-
Run-ahead latency reduction: When the emulator executes two instances of the emulation, one ahead of the other by n frames, and splicing via save states the state of the second instance to cut the frames of input lag. ↩
-
Dual-booting: using more than one operating system on your PC, switching to one or the other when booting it up. ↩
-
Dot clock: or dot frequency, the amount of pixels being displayed by your GPU per second. ↩
-
Modeline: a line of text that describes the characteristics of a video signal to be outputted by the computer. ↩
-
In the context of groovyarcade, front-end just means the program that will be boot up by default. It normally is attract-mode, a frontend for (groovy)mame, but I recommend you use retroarch instead for a more general purpose gaming station. ↩
-
Super resolutions: due to the problem some GPUs have with outputting low dot clocks required for SD resolutions, you can use super resolutions instead: this means outputting a resolution like ‘2560x240’ instead of the usual ‘320x240’ for example. This works because CRTs don’t really care about horizontal resolutions, unlike modern displays: what matters is the amount of lines shown. Because of the higher horizontal resolution, the dot clock you’re actually displaying is higher than it would normally be, allowing even more GPUs to be compatible. As you can see, the horizontal ‘super resolution’ is normally a multiple of a lower, desired horizontal one. ↩